

In this tutorial, we'll learn how to get that smooth shiny Anime look. We'll start with a simple character outline and build the correct hierarchy for the base colors, tones and highlights. Also, we'll learn how to work with this "method" for later projects in case the client or director will ask for changes, it will be easy to replace colors for a specific part of the character without redrawing all the tones and highlights again! You are about to learn one of the many techniques from the Anime industry. Let's get started!
Final Image Preview
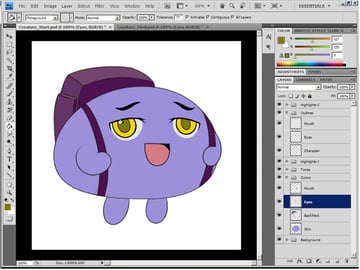
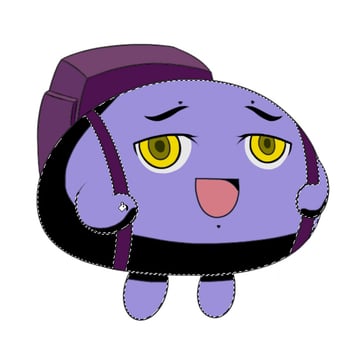
Take a look at the image we'll be creating.
Tutorial Details
- Program: Adobe Photoshop CS4
- Difficulty: Beginners
- Estimated Completion Time: less then 30 minutes


Before We Start
Psd Plus members will find 2 files provided in this tutorial. "Creature_Start.psd," contains only the outlines of the creature we will start to work with. "Creature_Final.psd," contains all the final organized layers in the correct hierarchy, effects and background for you to explore.
Step 1
Load the provided "Creature_Start.psd." You should see a cute rounded creature over a white background. Notice you will have two groups: "Outlines" and "Background."


Step 2
We want to keep everything organized and easy to follow for our workflow. That's why we start building the correct hierarchy for the project by making all the groups with the right names. Create those groups, and make sure to put them in the correct order, which is very important: "Highlight-2," "Outlines," "Highlights-1," "Tones," "Colors," "Background."


Step 3
Now it's time to create the basic colors for our character. Select the "Colors" group, then create all the layers we are about to use as the base colors for the character: "Mouth," "Eyes," "Backpack," and "Skin."


Step 4
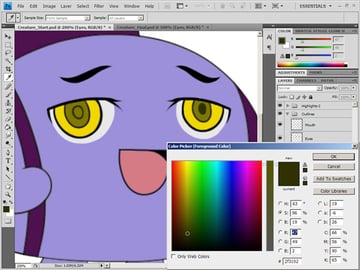
Select the color for the Skin, you can select ANY color that you want, but it's recommended to choose something not too dark or too light, something in the middle so we'll be able to see the Tones and Highlights later on.


Step 5
Before we start painting, select the Paint Bucket Tool and make sure that these three options are checked: Anti-alias, Contiguous, and All Layers. It will let us paint the area we want without painting in the same layer as the outlines, which is a very important part on any Anime production, separating outlines from the base colors and other layers. Open the "Outlines" group, Hide the "Mouth" and "Eyes" layers. Now all you can see is the character with the backpack.


Step 6
Painting the Skin is very easy. Make sure that you choose the "Skin" layer inside the "Colors" group Now use the Paint Bucket Tool and paint inside the character's body.


Step 7
Painting the Backpack is a bit more advanced then just one color like the skin. Make sure that you choose the "Backpack" layer inside the Colors group. We will use a color split into three, light, medium, and dark. You can choose any color that you wish, in this case I chose purple.
We won't focus on light theories in this tutorial because we want to learn the main technique of compositing a character, so let's keep it simple and easy to understand. The light color will come from above, the medium from the side, and the dark on the front. The following image shows you the way you should do that, split into sections.


Step 8
Painting the mouth is simple. First check the "Mouth" layer inside the "Outlines" group. Now that you can see the mouth, make sure that you choose the "Mouth" layer inside the "Colors" group. We will use two colors, I chose something between red and pink for the tongue and black for the inside mouth.


Step 9
Painting the eyes is also simple, but we will have to draw a guide for the main eyeball. First check the "Eyes" layer inside the "Outlines" group to make it visible. Make sure that you choose the "Skin" layer inside the "Colors" group. Select the Paint Brush tool with 3 pixels size.


Step 10
We will use three different colors: White (not pure white, but a bit darker), Yellow, and Darker Yellow. Feel free to choose any colors that you want, but for the white part of the eye I highly recommended to never go with pure white for eyes or teeth because the pure white will take it's part on the Highlights, we will focus on that later on.
Start with a rounded line for the white part of the eye. Do the same for both eyes. Remember, you can draw a bit under the outlines, it's just like a safety net to make sure your line doesn't shave too closed gaps. If you feel comfortable, then zoom in a bit to do it.

Step 11
After we have a guide for the white part of the eye, lets continue painting the rest of the eyes. Select the Paint Bucket Tool, and paint the White, then the (not pure white, but a bit darker), Yellow, and Darker Yellow.

Step 12
Finishing the basic colors of the eye, we don't have to but we can add one more rounded darker sphere at the center of the darker yellow color, this will be the smallest part of the eye. Select an even darker color than the dark yellow you used, something more close to black, but give it some color so it will be more interesting with the rest of the eye. Select the Paint Brush Tool again and draw the sphere and paint it. Again, feel free to zoom in bit as that may be more comfortable.

Step 13
Now we have a completed colored character, but it looks like it's flat and simple. So have a good look on the current colors, because we are about to give it the look of professional Anime style.


Step 14
Tones are very important part for the Anime look, there is a very complicated explanation behind it because in Anime, just like in other styles, tones won't represent only the light expressions over a material, but it will also represent the type of the material. In this tutorial we won't get deeper into tones, we'll focus on how to work with tones and how easy it is to draw it thanks to our organized layers and groups hierarchy.
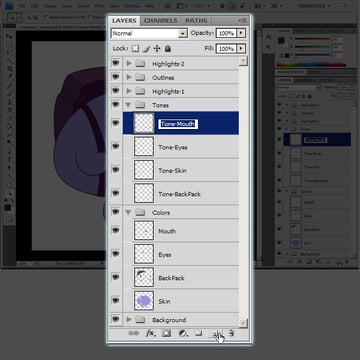
We will start with building the layer names in the right order just like we did earlier with the colors: Select the "Tones" group, then create all the layers we are about to use as the different tones for the character: "Tone-Mouth," "Tone-Eyes" "Tone-Skin," and "Tone-Backpack."

Step 15
Now you'll learn a new method and start to understand the reason behind our groups and layer hierarchy. Our first tone will be for the skin. Select the "Tone-Skin" layer under the "Tones" group. Hold the Control button and click on the thumbnail of the "Skin" layer under the "Colors" group.


Step 16
You will notice that the character's skin area is now selected. That means we are able to draw only inside this specific area. Select the Brush Tool with the size of 3 pixels, and select black for the color. Start to draw around the shape guide for the rounded creature's body. Then one line under each foot.


Step 17
Select the Eraser Tool and erase the line that crossed over the creature's hand.


Step 18
Add tones for the hands in a shape of water drops. Also, add three small triangle-like shapes: two above the eyebrows, and one under the mouth.


Step 19
Select the Paint Bucket Tool and fill inside the guides we just created.

Step 20
Use Gaussian Blur to make the tone softer (Filter > Blur > Gaussian Blur), and select a low radius - something between 1.2 to 2.5 and see what you like most.


Step 21
Press Command + D to deselect the current selection. Select the "Tone-Mouth" layer under the "Tones" group. Hold the Control button and click on the thumbnail of the "Mouth" layer under the "Colors" group. Draw a line at the top part of the tongue.


Step 22
Select the Paint Bucket Tool and fill inside the guide for the tongue. Then make the tone softer by using the Gaussian Blur again (Filter > Blur > Gaussian Blur), and select the same radius that you used for the skin.


Step 23
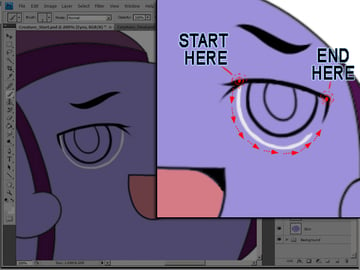
Press Command + D to deselect the current selection. Select the "Tone-Eyes" layer under the "Tones" group. Hold the Control button and click on the thumbnail of the "Eyes" layer under the "Colors" group. Draw the shape of the original eyes inside of each circle and a line on the top near the eyebrow.


Step 24
Select the Paint Bucket Tool and fill inside the guide for the eyes. Then make the tone softer by using the Gaussian Blur again (Filter > Blur > Gaussian Blur), and select the same radius that you used for the skin.


Step 25
Press Command + D to deselect the current selection. Select the "Tone-Backpack" layer under the "Tones" group. Hold the Control button and click on the thumbnail of the "Backpack" layer under the "Colors" group. Follow the guides shown below to create the backpack tone. Try to draw it as you see, it's very simple.


Step 26
Select the Paint Bucket Tool and fill inside the guide for the Backpack. This time, don't soften the tone for the Backpack, we want it to look a bit sharper than the creature's tone. Press Command + D to deselect the current selection. Select the "Tones" group and reduce the Opacity from 100% to 30%


Step 27
Just like the tones, The highlights are a very important part for the Anime look. There is a complicated explanation behind it because in the Anime just like in other styles highlights won't represent only the light expressions over a material, but it will also represent the type of the material, in this tutorial we won't get deeper into highlights, we'll try to focus on how to work with highlights and how easy it is to draw it thanks to our organized layers and groups hierarchy.
Start with building the layer names in the right order, just like we did earlier with the colors. Select the "Highlights-1" group, then create all the layers we are about to use as the different highlights for the character" "Mouth," "Skin," and "Backpack."


Step 28
Select the "Mouth"" layer under the "Highlights-1" group. Hold the Control button and click on the thumbnail of the "Skin" layer under the "Colors" group. You will notice that the character's skin area is now selected. Select the Brush Tool with the size of 3 pixels, and select white for the color. Start three wave lines at the top of the character's head.


Step 29
Now add the little circle shapes on the hands, legs, and one under the mouth (lips area) to complete the highlights for the skin. Fill everything with the a white color. Then to make the highlight smoother, use Gaussian Blur (Filter > Blur > Gaussian Blur), and use a lower radius, something between 0.7 to 1.2 will be enough.


Step 30
Press Command + D to deselect the current selection. Select the "Mouth" layer under the "Highlights-1" group. Hold the Control button and click on the thumbnail of the "Mouth" layer under the "Colors" group. Draw two circles at the bottom-left of the tongue.


Step 31
Press Command + D to deselect the current selection. Select the "Backpack" layer under the "Highlights-1" group. Hold the Control button and click on the thumbnail of the "Backpack" layer under the "Colors" group. Follow the guides shown below to create the backpack highlights. try to draw it as you see, it's very simple.


Step 32
Select the Paint Bucket Tool and fill inside the guide for the Backpack. Don't soften the highlights for the Backpack, we want it to look a bit sharper than the creature's highlights. Press Command + D to deselect the current selection. Select the "Highlights-1" group and reduce the Opacity from 100% to 33%


Step 33
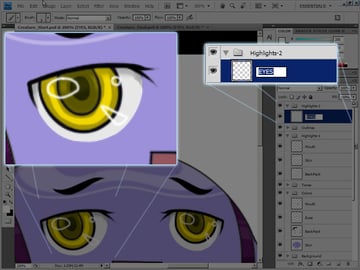
Shiny eyes are important as much as any other part we've done so far, it will attract most attention. Select the "Highlights-2" group and create a new layer, and name it "EYES." The reason for this group to be the highest over all the groups is because it should be also over the outlines. Draw 2 circles and one triangle-like shape for each eye as shown.

Step 34
Select the Paint Bucket Tool and fill inside the eye guide. Now click on the layer with your right mouse button and select Layer Properties.


Step 35
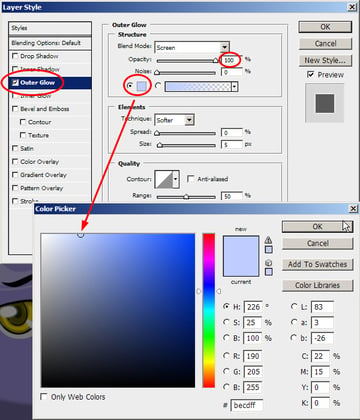
To make the eyes more shiny, we will add a nice glow effect to it. In the Layer Style window that just opened, check the Outer Glow on the left. Change the Opacity to 100% and click on the yellow cubic to select a light blue color. Click OK when you're done.

Step 36
Great! Now we're done with the creature, cute right? It's time to add a nice background to make our final look come together. Collapse all the layers, then select the "Background" layer. Create the next layers: "BG-Lights-2," "BG-Lights-1," "BG-1," and "Background" (already there by default).


Step 37
Hide all the groups by clicking on the eye icons of each group, leave only the "Background" group visible. Select the layer "BG-1." Hold your left mouse button on the Bucket Tool and select the Gradient Tool.


Step 38
Select a dark green color, and a light blue. Then pass a line from the bottom-left corner of the canvas to the top-right corner of the canvas.


Step 39
Select the layer "BG-Lights." Select the Rectangular Marquee Tool, and use it to draw a wide box starting from the top of the canvas, we are creating thick horizontal lines. When you're done with the first box, hold the Shift button, and draw 4 or 5 more indifferent sizes of boxes.


Step 40
Hide the "BG-1" layer so we will be able to paint the lines with no issues. Select the Paint Bucket Tool and fill the inside of the boxes with a white color. Now clicking anywhere on the canvas will do the job, as it will color all the boxes. Unhide the "BG-1" layer again, and you should see white boxes over the green-blue background.


Step 41
Press Command + D to deselect the current selection. Zoom out twice, by selecting the Magnify Tool, then point your mouse on the canvas. Hold the alt key until you see a minus sign and click twice.


Step 42
Press the V button for the Pan Tool. Press Command + T for the Free Transform Tool. Enter the numbers to resize and rotate the lines into beam-like shapes using these settings: X at 300, Y at 310, W at 200, H at 140, and Angle at -35. Then press Enter to apply the changes.


Step 43
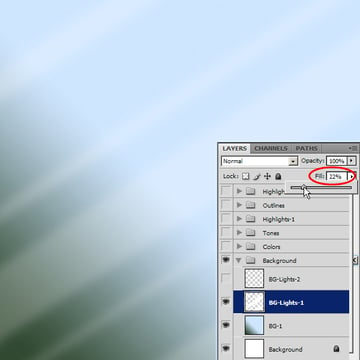
To make the tone softer we will use the Gaussian Blur again. Filter > Blur > Gaussian Blur, then select a radius between 7.5 and 9. Change the Fill from 100% to 22%.

Step 44
We need to add another light. Select all by Pressing "Command + A" and then copy by pressing Command + C. Select the layer "BG-Lights-2" and press Command + V to paste.
Now we need to tweak it just a bit so it will look different. Press Command + T for the Free Transform Tool and make it a bit bigger and also rotate it a bit. Just play with it by changing the numbers on top, or click on one of the tiny white squares and move them around. When you're done click Enter to apply, then change the Fill from 100% to 35%.


Step 45
Unhide all the groups and have a look at the final result. To show you how dynamic this technique you just learn is, lets do few tweaks. Let's quickly change the color of our character.
Select the "Skin" layer under the "Colors" group. On the top menus select: Image > Adjustments > Hue/Saturation, or press Command + U and try to scroll the default Master Hue and the Saturation sliders to the left and right to see what color you like. You can also change the RGB to get even more specific color that you want. When you're happy with the new skin color, click OK.


Step 46
Feel free to change in the same way the rest of the parts, that's why we separated them from each other. The more dynamic it gets the easier it is for us to tweak for our clients or directors we work with. Below is what I came out with after a few color changes.


Conclusion
Using these techniques you are able to change colors, add or replace parts on the drawing with few clicks. You don't need to change any of the Tones or Highlights, unless you want to make something a bit darker or more shiny, and then you will only need to play with the Fill and Opacity of the layers.
Try to create your own character, start with the outlines, try to separate it into parts like we did, and follow these techniques to get the best results.


